Saturday, February 25, 2012

A Necessary Storage Unit

  Through the winter I've become weary of carrying adhesives into the house from my very cold shop. I have three electric heaters, but running them all trips the breaker, and running one big one only maintains the garage at about 40ºF.  I don't leave heat on all night, so our Pacific NW chills of 20ºF at night don't do my finishes any good, either.  The solution was a heated cabinet for storage of all these shop necessities.

  I started with drawings to design a tall skinny cupboard to fit an available space. I had 60" in height, 15-1/2" in width, and 10" in depth to work with.  I did a lot of scribbling and gathered some plywood and old shelving salvaged from a kitchen remodel years ago.


  I cut pieces and added in the shelves, leaving 1-1/2" open space at the back and 1" open space at the front of each shelf for air flow to carry the heat throughout the cabinet.


  Then I turned four bun feet out of oak because it would wear well against a concrete floor.


And cut foam board to lay in for insulation on all inside surfaces.  The thermostat at the top of the cabinet is wired in series with the 60 watt light bulb at the bottom, so as I set the temperature it turns the light on and off.  (Credit goes to George for helping me with this.) The light bulb is protected by a wire cage taken off an automotive trouble light so if something falls, the bulb won't be broken.


All assembled and the hinges added on.  Four small rare-earth magnets hold the door closed. I still need a knob or handle on it.  The top overhang on the right side is to store four cam clamps I have nowhere else to put.  I'll be adding some hooks on the right side for various things, too.


And here is the inside with the light on, fully insulated with foam board.

  I've photographed it outside, and will be putting it in place after testing it all night as our temperatures drop.  I have an independent thermometer to place inside for a reading.

  It's such a sense of accomplishment to complete some new shop furniture.  I love getting my storage more organized and freeing up space where all these things are scattered around, and now drawn together in one place so I know better what I have.  

  So, enough with the shop organization for now.  On to some real projects!


copyright Barb Siddiqui, use with permission only


Tuesday, February 7, 2012

Woodworking: Where To Begin?

 Tom Iovino's  'Get Woodworking Week'  was conceived to encourage more people to try their hands at the craft.  Encouraging beginners to adopt the attitude "I Can Make This" has long been one of my focal points.  Here are some pointers to get you started if you've ever thought of making anything out of wood.


  Okay, so you've decided you want to try woodworking, and you're full of questions. 'What will I need?' and 'How do I begin?'  Well, you don't know it, but you are tremendously lucky, because with little effort you can find a wealth of information and guidance at your fingertips. Woodworkers just happen to be a set of the most generous, helpful and willing instructors on the planet. They love their craft so much, they are always excited to have someone express an interest and ask questions.  And the internet?  If you google a question, the number of sources for its answer may be overwhelming.  I'll help with that with a few links at the bottom of this post.

  First off, you'll begin assembling a tool kit depending on what beginner's project you decide to tackle. We buy tools as we need them, not in kits or bundles.  Learning with hand tools before power tools will teach more about the wood and how it reacts than jumping right in with thousands of dollars and outfitting a powered shop. Think of it this way: to work wood, you'll need something to cut with, to drill with, to measure with, to glue with and to clamp tight with.  Oh, and a library.  Here are two books I'd recommend reading, to better help you understand how all this works:


This one, because the author explains many ways of making any joint you may need or want. He shows many home-built jigs for assembly and several methods for each procedure.


        And this one by Andy Rae, with tips, tricks, recommendations,        
        alternatives and guidance in all things wood.


  And if you have special interests such as carving or turning or fireplace mantels, here is a long list of woodworking books for you to consider:    Book Reviews at WoodCentral.com

  The next step is deciding on a project to start with. The internet references below can help with that, but consider deciding to make something you want to do, for a specific purpose. Maybe a coat-hangar shelf or a bathroom shelf. You can see it in your mind, with hooks on or pegs.  You know it has to fit a space, say 22" long, because a wall gets in the way if it's any longer than that, or it won't look good hung beside a mirror if it's too close to it. Think of something you want to make, and where it has to go. Consider its stability. For example, if you need another book shelf and you want it to stand on the floor, it may be more sturdy if the bottom shelf is wider than the top shelf, so heavier loads can be stored down below and anchor it against the wall by weight.  Learning by doing will teach you these things, but thinking ahead can save you some misdirected time.  You can always go to a woodworking forum and jump right in to ask a question, too.


  So, to begin, here are some internet references to get you started.

Fine Woodworking's StartWoodworking.com  has tips, plans and lots of resource listings.

WoodFinder.com  is a great resource for finding suppliers and retailers for wood sold close by.

Tips from WomenInWoodworking.com  
has a listing of my past Starting Points columns and lots of help for beginner's projects.

 Be sure to check out other Wood Bloggers' Get Woodworking posts from Tom Iovino's Blog at Tom's Workbench.

If you decide to set your mind to attempt this, you're in for a very satisfying experience. Nothing beats hearing a family member or neighbor say,  "You mean you built this?"  in awe of your abilities.
Go ahead, Try It.


Monday, January 9, 2012

The Importance of Work Stations

 I love individual work stations. Having everything you  need, in one spot, close by where you need to work, makes for greater efficiency as well as a pleasant experience.  If you can group tools and their needs close together,  you're more likely to work more safely, because you aren't tempted to overlook things and take short cuts.

 The little roll-around cabinet below (subject of an article in the first issue of Woodcraft Magazine, January 2005) was designed to hold all the appurtenances and bits to go with my standing drill press. It also serves double duty as an adjustable infeed/outfeed roller stand for the table saw, band saw and drill press. I store a depth stop, screw extractors, files for sharpening bits, circle cutters, hole cutters, a hole-size gauge, and anything else pertaining to the drill press. It's one of those 'how-did-I-get-along-without-this' shop necessities.


 And beneath my little workbench, I've added in a shelf to hold my portable sharpening station, a box to contain and protect a collection of oilstones:


It is french-fitted to loosely hold three grits of oilstones and is simple to just lift up onto the bench to work with, or to any other flat surface not buried under wood blanks or other tools at the time I need to sharpen chisels or plane irons or carving gouges.


The stones lift out to wash away a build-up of swarf, or to turn them over for use, or to flatten against another.  I included a small well for storing a slip stone and other miscellaneous sharpeners, and glued a wide leather strop to one end. There is also a steel plate for use with diamond pastes.


Having everything so easily to hand has made touch-up sharpening much easier, and I sharpen more often than I used to, when my supplies were scattered. The box keeps them clean, and can be used anywhere.

 Work stations improve all my shop time.  I have a unit for sandpaper storage, but need to do one for finishes and finishing supplies. It's on my list.

 If you have any other innovative ideas for individual work stations, please share!  I'm always open to new ideas for better shop efficiency.


©Barb Siddiqui, use with permission only


Tuesday, December 27, 2011

Old Fashioned Toys for the Holiday

  Another Christmas has come and gone.  The grandkids have gotten bigger, a new baby has been added, and everyone in the family wondered what I'd come up with for hand made gifts from the shop.
  The really fun part of the holiday was that the kids found just as much fun in old-fashioned toys as they did in new electronic games!  I made six small spin tops with colorful chatter work on both sides, top and bottom:

The kids had a lot of fun competing with them, and even got them to work upside down:


Then there were the Klopper Stompers, made of pine scrap drilled for a rope handle.  Stomping among the wrapping papers became a sport of its own:


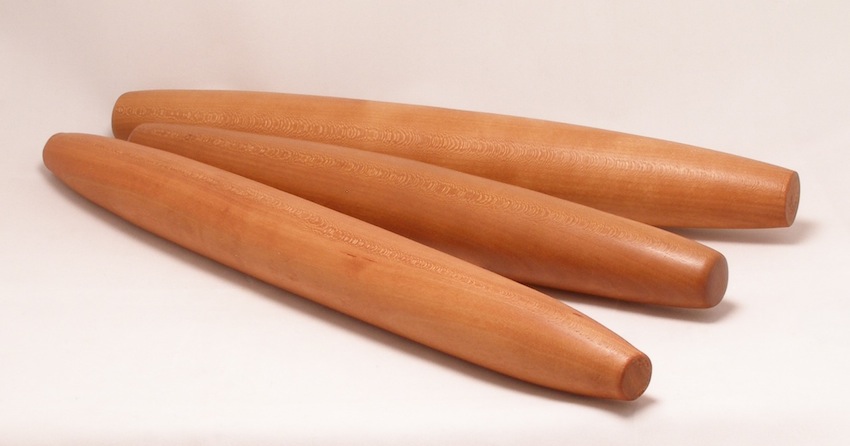
And for the adults, a few wine bottle coasters and French rolling pins made of local orchard Cherry:


What a great year!   But, next time, I think I'll start making presents in August. It would relieve the stress level quite a bit.  Happy Holidays to all, and here's to a great New Year!

Tuesday, November 22, 2011

Monday, November 21, 2011

It's All In the Process

My previous blog entry was one of 'Impatience For TheWork.'  I had a piece of spalted birch on the lathe, and was anxious to get it hollowed out so I could start on newer pieces waiting for me.  I completed the spalted birch piece with a red cedar collar:


The collar on it was intended to sweep upward in a beautiful cove, standing tall and polished above the spalted birch. In cutting it thin, I destroyed that idea with one dramatic catch, which cut a chunk out of the collar a full two inches down the cove I'd so lovingly completed. The collar, with much gnashing of teeth, then became a narrow rim. It was obvious after that, that I needed to make a lid for it.
 The first lid was an ill fit, so I moved on to a second try.  The second sported a thin, tall finial that comically looked too small on top of the vessel. The third lid was better, but it seemed to emphasize the fact I'd missed a 'fair curve' on the vessel itself. The outer curve flattens toward the bottom instead of continuing in a natural arc:


So, the vessel went back on the lathe over a jamb chuck, and I re-cut the bottom half, allowing the arc of the curve to sweep down to the base.  It was only a small difference, but it made a big difference in the look of the turning.


I am learning to not get too impatient with what I'm trying to do, and I'm finally satisfied!  The vessel is 10" tall overall, and is available for sale at BarbS Woodworks

Wednesday, September 21, 2011

Impatience for the Work

  I'm wondering if other woodworkers suffer this malady: after thinking through design options and solving many problems, there seems to be a certain threshold that is crossed in thinking through the process of making something.  It isn't intimidation, it isn't fear of failure, and it isn't really impatience. I think it is simply a lack of interest in the piece after the challenges are solved.

  Before final completion, when I can at last 'see' what the finished product is going to look like, and when I know it is stable and no longer threatened with disintegration, I so often feel like setting it aside and getting on to the next one. Here's a vase form of spalted birch that I've set a narrow collar on, shaped and filled with ca glue and sawdust to fill small, unsightly gaps and flaws, sanded wet with oil and successfully hollowed out to about 3/4 of its depth.


  I'm anxious to get this thing completed and off the lathe.  I've little interest in it now.

  And this may be the reason, a 14" walnut blank 3" deep given by a friend, with another below it waiting to be assessed and its shape determined.  Just look at the streaks of color in that side grain!  I cannot Wait to get to it and see what it will reveal.


Meanwhile I have to finish the spalted birch vase.  I'm really just humming along trying to hurry the old project so I can get to the new.  Having so much beautiful wood all at the same time is a curse,  I tell you...it's a curse.  Back to the shop!