Friday, November 23, 2012

Handmade -- All Year Long!


Whatever the occasion, consider hand-made goods from craftsmen working to offer unique gift ideas.  Keep an eye on my Etsy Treasury Lists for unique gift ideas from wood artists year round: 

And here are just a few of the many retailers of handmade gifts to consider for gift giving all year:

Pens and Wood Items:  Greco Woodcrafting

Pens and more Pens: Pen Street Woodworks

Handmade Furniture bySierra Living Concepts

More Handmade Furniture:  tkelly furniture

Fine Handmade Boxes: Watswood

Fine Hand Tools for the Woodworker: Bad Axe Toolworks

Wood Art by Douglas J Fisher

Fine Sculpture in Wood: Mirabelli Designs

A woodworker's dream:  Scott Meek Woodworks

Exceptional Handmade Soaps: Riverhouse Bath and Body

 The Hand Forged Adze: Kestrel Tool

Unique Hand Engravings: Catherine Kennedy Engraving

Wood turning and Furniture:  Brian Havens

Garden Sculptures: Birdhouses by Glenn

Wonderful Woodcarvings: Artist In Wood

and More wood carving, plus classes in Ohio: Wood Carved Art

Colorful wood turnings: Makey77

and Natural-edged wood turnings: J & L Woodturnings

and Turnings from Exotic Materials: Turned To Treasure

and of course, I cannot leave out my own websites for your perusal:


There are Many Many More artisans and craftsmen always ready to commission work for giving, so just Google 'Handmade Gift' if you are at a loss for ideas.  Or check out Etsy.com or CustomMade.com for original, unique and handmade items to your liking.  It's a wide world out there, with lots to see and lots to choose from.

Support Handmade Art!


Saturday, September 22, 2012

Gathering Woodworkers For History

 I am very honored to be included in a project put forth by fellow woodworker 
      Jed Dyke, on his Blog

 Jed had the good fortune to meet some very famous woodworkers, and the good sense to ask for their autographs, collecting signatures on wood blocks.  He may frame them someday, he said, but the collection is getting to the point it may cover a wall before he is done.  This is just one photo of several, so be sure to check out his Blog post on how all this came about, and see who he has managed to include so far.   I feel quite privileged to be included among so many woodworking stars!


Wednesday, August 15, 2012

The First of my Grandkids to Hit The Shop

  It isn't Christmas, but it felt like it. At Christmas, though, there are so many little kids running around feeling up the Christmas tree, that my efforts are directed on mob control more than shop directions.  This summer, I was fortunate to get a one-on-one with a single nine-year-old grand daughter, who lives 200 miles away.  I asked if she'd like to learn to use the lathe in my shop. She thought a minute, looked at her mother, and grinned, saying 'Yes' very quietly.  I think I beamed.
   I offered her several kits I had available: a magnifying glass, pens, key rings, and a touch screen stylus. She chose the stylus, much to my surprise. Her mother said, "You do realize that only does what you already do with your finger, don't you?"  She laughed and said, "Yes, but it's so Cool!" and I said, "Stylus it is, then."
  So, with her mother fluttering like Henny Penny every time I introduced a machine to the girl,
we forged ahead. I used the radial arm saw while she watched, with safety glasses on. I shielded her bare arm from the spinning drill chuck.  I positioned her so her pigtails wouldn't swing into the headstock on the lathe. We adjusted the face shield to perfection.  I explained what a tool bevel was, showed her what was about to happen with the lathe spinning, and stood behind her to help control her first moves with a spindle roughing gouge.
  She took to it like a champ. She listened well, was cautious with all that was new to her (she had no problem with sanding; her dad is a remodeling contractor and she'd been in his shop) and did exactly what she was told. She was only distracted by the baby lizard that ventured inside the garage door to sunbathe on the concrete. Five minutes with that and we were back to turning.
  She is one of eight grandchildren, so far. The others want their turn, too, so the future is bright.
And I must say, there is nothing quite like the bursting pride a youngster shows when they've completed their own project.  Her mom wrote me after returning home, saying "Thank you for that. She's completely enamored with it."   And I with her.   It was a Great weekend!

Very First Turning


Sunday, May 13, 2012

New Tool Handle

Just have to show off my new Curly Cherry tool handle on the newly purchased bent hollowing tool from Greg Darlow at Woodbarter.com.  Now I can do deep hollowing in style!  25-1/2" long overall.


Sunday, April 29, 2012

Flame Box Elder Bowl

Just finished a sweet little, 5" diameter bowl in Flame Box Elder.  It is already promised, but I have a bit more of this wood, so stay tuned!


Sunday, April 22, 2012

Desk Clocks

I had a few pieces of showy wood I didn't know quite what to do with, and decided on these:


I think they turned out rather well, and now I'm plotting how to do more.
The top photo is Big Leaf Maple Burl, about 8" tall and 11-1/2" wide.
The bottom one is some kind of unknown Pine, with a brilliant red, flame-grained surface when oiled. It is 10" tall and 4-1/2" wide at the base.  Each has a clock face of 1-3/8", large enough to read close by on a desk top, and small enough to show off these flashy woods.

The tall pine clock is available at my Etsy website:  BarbS Woodworks
The maple burl clock is on Desk Accessories on my main website.

Friday, March 23, 2012

Oh, my aching back!

Tonight I sit with a heating pad on my back. My shop is cluttered with freshly cut turning blanks stacked helter-skelter on top of each other, with latex paint protecting the end grain of each one. Twelve and fourteen-inch blocks sit in the wheel barrow, on the bench, atop an extra chair, and sawdust from the band saw litters the floor as if the place was a circus tent.

Here is where it began: a yard tree we are sorely going to miss.  Catalpa, in winter, with no hint of its elephant-ear leaves, pyramidal white flowerette blossoms and 12-in. long bean pods. It gave us plenty of shade, lots of birds' nests, several wood peckers, and even a big horned owl one year. Yes, we'll  miss this tree. It was old. It was rotting from the inside. And it had to come down.


The tree service ground up the small stuff, and piled huge hunks of the trunk and main branches on our side lawn.  I am the proud owner of a new Peavy Hook.  It's a monster tool, and just what I needed to move these chunks around so I can get to them with my small electric chain saw.  I begin by lopping off outer parts of the edges, then cut from two sides toward center. It's a lot of labor, but it feels tremendously good to get some results before all this wood cracks beyond redemption.


Tomorrow is another day.  I need to rearrange, to make room for storage. And I'm planning on cutting some more big pieces with the chain saw.  And learning to use my Peavy Hook. And, the forecast is for a sunny, beautiful day.  Life is good.

Monday, March 19, 2012

Readers Gallery/ Woodturning Magazine

I'm honored to be included in the Reader's Gallery section of GMC Publications Woodturning Magazine in the UK, issue 236, February 2012.


Thursday, March 15, 2012

A Fun Project!

Having some fun over the last two days.  I have a few birthdays coming up, and these are really popular with the Grandkids!


Saturday, February 25, 2012

A Necessary Storage Unit

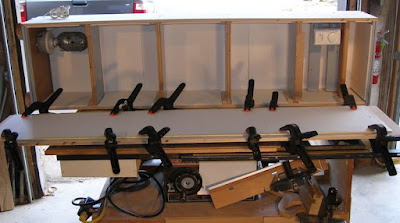
  Through the winter I've become weary of carrying adhesives into the house from my very cold shop. I have three electric heaters, but running them all trips the breaker, and running one big one only maintains the garage at about 40ºF.  I don't leave heat on all night, so our Pacific NW chills of 20ºF at night don't do my finishes any good, either.  The solution was a heated cabinet for storage of all these shop necessities.

  I started with drawings to design a tall skinny cupboard to fit an available space. I had 60" in height, 15-1/2" in width, and 10" in depth to work with.  I did a lot of scribbling and gathered some plywood and old shelving salvaged from a kitchen remodel years ago.


  I cut pieces and added in the shelves, leaving 1-1/2" open space at the back and 1" open space at the front of each shelf for air flow to carry the heat throughout the cabinet.


  Then I turned four bun feet out of oak because it would wear well against a concrete floor.


And cut foam board to lay in for insulation on all inside surfaces.  The thermostat at the top of the cabinet is wired in series with the 60 watt light bulb at the bottom, so as I set the temperature it turns the light on and off.  (Credit goes to George for helping me with this.) The light bulb is protected by a wire cage taken off an automotive trouble light so if something falls, the bulb won't be broken.


All assembled and the hinges added on.  Four small rare-earth magnets hold the door closed. I still need a knob or handle on it.  The top overhang on the right side is to store four cam clamps I have nowhere else to put.  I'll be adding some hooks on the right side for various things, too.


And here is the inside with the light on, fully insulated with foam board.

  I've photographed it outside, and will be putting it in place after testing it all night as our temperatures drop.  I have an independent thermometer to place inside for a reading.

  It's such a sense of accomplishment to complete some new shop furniture.  I love getting my storage more organized and freeing up space where all these things are scattered around, and now drawn together in one place so I know better what I have.  

  So, enough with the shop organization for now.  On to some real projects!


copyright Barb Siddiqui, use with permission only


Tuesday, February 7, 2012

Woodworking: Where To Begin?

 Tom Iovino's  'Get Woodworking Week'  was conceived to encourage more people to try their hands at the craft.  Encouraging beginners to adopt the attitude "I Can Make This" has long been one of my focal points.  Here are some pointers to get you started if you've ever thought of making anything out of wood.


  Okay, so you've decided you want to try woodworking, and you're full of questions. 'What will I need?' and 'How do I begin?'  Well, you don't know it, but you are tremendously lucky, because with little effort you can find a wealth of information and guidance at your fingertips. Woodworkers just happen to be a set of the most generous, helpful and willing instructors on the planet. They love their craft so much, they are always excited to have someone express an interest and ask questions.  And the internet?  If you google a question, the number of sources for its answer may be overwhelming.  I'll help with that with a few links at the bottom of this post.

  First off, you'll begin assembling a tool kit depending on what beginner's project you decide to tackle. We buy tools as we need them, not in kits or bundles.  Learning with hand tools before power tools will teach more about the wood and how it reacts than jumping right in with thousands of dollars and outfitting a powered shop. Think of it this way: to work wood, you'll need something to cut with, to drill with, to measure with, to glue with and to clamp tight with.  Oh, and a library.  Here are two books I'd recommend reading, to better help you understand how all this works:


This one, because the author explains many ways of making any joint you may need or want. He shows many home-built jigs for assembly and several methods for each procedure.


        And this one by Andy Rae, with tips, tricks, recommendations,        
        alternatives and guidance in all things wood.


  And if you have special interests such as carving or turning or fireplace mantels, here is a long list of woodworking books for you to consider:    Book Reviews at WoodCentral.com

  The next step is deciding on a project to start with. The internet references below can help with that, but consider deciding to make something you want to do, for a specific purpose. Maybe a coat-hangar shelf or a bathroom shelf. You can see it in your mind, with hooks on or pegs.  You know it has to fit a space, say 22" long, because a wall gets in the way if it's any longer than that, or it won't look good hung beside a mirror if it's too close to it. Think of something you want to make, and where it has to go. Consider its stability. For example, if you need another book shelf and you want it to stand on the floor, it may be more sturdy if the bottom shelf is wider than the top shelf, so heavier loads can be stored down below and anchor it against the wall by weight.  Learning by doing will teach you these things, but thinking ahead can save you some misdirected time.  You can always go to a woodworking forum and jump right in to ask a question, too.


  So, to begin, here are some internet references to get you started.

Fine Woodworking's StartWoodworking.com  has tips, plans and lots of resource listings.

WoodFinder.com  is a great resource for finding suppliers and retailers for wood sold close by.

Tips from WomenInWoodworking.com  
has a listing of my past Starting Points columns and lots of help for beginner's projects.

 Be sure to check out other Wood Bloggers' Get Woodworking posts from Tom Iovino's Blog at Tom's Workbench.

If you decide to set your mind to attempt this, you're in for a very satisfying experience. Nothing beats hearing a family member or neighbor say,  "You mean you built this?"  in awe of your abilities.
Go ahead, Try It.


Monday, January 9, 2012

The Importance of Work Stations

 I love individual work stations. Having everything you  need, in one spot, close by where you need to work, makes for greater efficiency as well as a pleasant experience.  If you can group tools and their needs close together,  you're more likely to work more safely, because you aren't tempted to overlook things and take short cuts.

 The little roll-around cabinet below (subject of an article in the first issue of Woodcraft Magazine, January 2005) was designed to hold all the appurtenances and bits to go with my standing drill press. It also serves double duty as an adjustable infeed/outfeed roller stand for the table saw, band saw and drill press. I store a depth stop, screw extractors, files for sharpening bits, circle cutters, hole cutters, a hole-size gauge, and anything else pertaining to the drill press. It's one of those 'how-did-I-get-along-without-this' shop necessities.


 And beneath my little workbench, I've added in a shelf to hold my portable sharpening station, a box to contain and protect a collection of oilstones:


It is french-fitted to loosely hold three grits of oilstones and is simple to just lift up onto the bench to work with, or to any other flat surface not buried under wood blanks or other tools at the time I need to sharpen chisels or plane irons or carving gouges.


The stones lift out to wash away a build-up of swarf, or to turn them over for use, or to flatten against another.  I included a small well for storing a slip stone and other miscellaneous sharpeners, and glued a wide leather strop to one end. There is also a steel plate for use with diamond pastes.


Having everything so easily to hand has made touch-up sharpening much easier, and I sharpen more often than I used to, when my supplies were scattered. The box keeps them clean, and can be used anywhere.

 Work stations improve all my shop time.  I have a unit for sandpaper storage, but need to do one for finishes and finishing supplies. It's on my list.

 If you have any other innovative ideas for individual work stations, please share!  I'm always open to new ideas for better shop efficiency.


©Barb Siddiqui, use with permission only